WARNING
Using any earphone at high volumes can permanently damage your hearing. Ringing in your ears or any other discomfort may indicate that the volume is too high. Always turn the volume down on your music source for your Jerry Harvey Audio™ Custom IEM before inserting the earpieces into your ears. Once both earpieces are in place, gradually increase the volume to a moderate level.
HEARING PROTECTION
When used properly, your Jerry Harvey Audio™ Custom IEM can protect your hearing by lowering the destructive ambient sounds and allowing you to listen at significantly lower Sound Pressure Levels. To avoid hearing damage, you should not be exposed to Sound Pressure Levels above 115 dB(A).

That said, be aware of the effects of excessively loud volume on the ears. Hearing health is critical to your enjoyment and quality of life. For more information visit osha.gov.
- If you experience any discomfort or pain while wearing Jerry Harvey Audio™ Custom IEMs, remove them immediately.
- Consult an audiologist or physician if you develop hearing problems, excessive wax build-up or any discomfort after use.
- Do not submerge your Jerry Harvey Audio™ Custom IEM or expose it to water.
INSERTING THE EARPIECES
Your Jerry Harvey Audio™ Custom IEM was handcrafted to fit snugly and comfortably in your ears. To maximize your comfort and to optimize your listening experience, it’s important to insert the earpieces properly. For your convenience, your Jerry Harvey Audio™ Custom IEM is marked with blue lettering to indicate the left earpiece and red lettering to indicate the right earpiece.
- STEP 1 - Turn the output volume all the way down on the device you’ll be listening to through your Jerry Harvey Audio™ Custom IEM. ALWAYS decrease the volume BEFORE listening to any audio source.
- STEP 2 - Roll the IEM forward about a quarter turn, and carefully slide the sound bore into your ear canal.
- STEP 3 - Gently roll the earpiece backwards into your ear and push on the faceplate to create a secure seal.
- STEP 4 - Wrap cable up and behind each ear. Adjust plastic connector sleeve as needed for desired fit.

REMOVING THE EARPIECES
To remove the earpieces, pull the top of each earpiece out from under the upper rim of your ears. Then, roll the earpieces slightly forward, and pull them out from your ear canals. NEVER yank the earpieces out by their cords.
CABLE MANAGEMENT
Your Jerry Harvey Audio™ Custom IEM is lightweight and flexible. As such, it can be prone to tangling. Therefore, to ensure years of trouble-free use, proper cable management is essential. After removing the earpieces, pull the plastic connector sleeve up from the Y-section to bring both earpieces together. Coil the cord so it will fit in the provided carrying case.
ATTACHING YOUR CABLE
Your Jerry Harvey Audio™ Custom IEM was designed with a cable that can be replaced in the field.
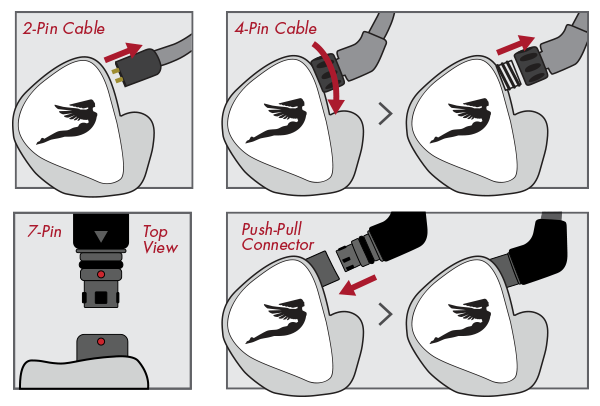
• To replace a 2-Pin Cable: Carefully unplug the cord at the base of each earphone. Pull straight outward when disconnecting the cable to avoid bending the leads. Insert the new cord by plugging the leads into the appropriate earpiece. The red and blue lettering face up on the earphone connectors—red indicating right, blue meaning left.
• To replace a 4-Pin Cable: Twist the collar counter-clockwise until the socket connection is exposed. Then, gently pull the cable away from the earphone. If you experience resistance, the collar may still be attached to the socket, twist to ensure it is loose.
The 4-Pin cable and socket are keyed to match up and easily reattach. To connect the cable to the earphone, align the notches of the cable so that they fit together and gently push until the cable is flush against the earphone. Next, twist the collar clockwise to tighten and secure the cable to the earphone.
• 7-Pin: To remove the cable, grasp the connector at the bend in the over-mold, between your index finger and thumb. With the opposite hand, grip the earphone shell securely and pull apart at an even force to separate. You should feel a slight resistance. The cable and earphone socket are keyed to match and connect easily. To attach the cable, locate the arrow on the top of the cable over-mold, align the small colored dots on the cable over-mold and the earphone, and then push together to secure.
BASS ATTENUATOR

The recommended bass setting is between the 1 o'clock and 4 o'clock position as highlighted in green. For proper sound balance, make sure that left and right channels match.
Your Jerry Harvey Audio™ 4-Pin Custom IEM cable is equipped with Variable Bass Control, which allows you to adjust the bass response on right and left channels independently. This feature is operated through a panel located on the cable. The 12 o’clock position sets the bass output to the lowest setting*. Turning to the 5 o’clock position will set the earphone to the maximum bass output**.
* The Lola™ Hybrid IEM has a unique design that allows for no bass response when turned down past the 12 o’clock position. Therefore, we recommend setting the bass between the 1 o’clock and 4 o’clock position.
** The key cannot turn past the 5 o’clock position. If forced further, you may damage the cable permanently.